How to change Facebook fan page name


If you got a Facebook Page, I think you should already know that Facebook doesn’t allow you to change your Facebook page name. That is the big problem that most Facebook Fan page owners are having now. So, before you create your Facebook fan page, make sure you name your page properly as you only has one chance to give your page a good name that you like. You cannot change it anymore in the future.


Here are some of the main problems that many Facebook page creators are facing now: How can I change my Facebook page’s name? 1. I wrote the wrong name and now I don’t know how to change it. 2. The club name of my community has changed, I wish to change the name appeared on my Facebook page too. 3. My business Facebook page has changed the original industry or category. 4. Anymore cases?

Possible solutions: You can go to the bug reporting page here to let the Facebook team know how to diagnose the problems that you are seeing.

Some people are crying, want to change their page name. A simple feature for changing your Facebook page name is NEEDED NOW! To voice your frustration, fan these pages.

Agents of Change: Change Face Book Page Name #FAIL

How do i change the name of my fan page!


Show Adsense ads in the middle of blogger posts

untitled1

Adsense earnings for image ads are highly derived by the location where they are placed and for the text ads if placed inside the body depends upon how inherited they are with its surroundings.

For post there are post header ,post footer and middle of post where you can place the Adsense ads. Adsense code can be easily placed in post header and footer but for the middle certain JavaScript technique has to used.below code.

<data:post.body/>

and replace it with this one

<div expr:id='"aim1" + data:post.id'></div>

<div style="clear:both; margin:10px 0">

<!-- Your AdSense code here -->

</div>

<div expr:id='"aim2" + data:post.id'>

<data:post.body/>

</div>

<script type="text/javascript">

var obj0=document.getElementById("aim1<data:post.id/>");

var obj1=document.getElementById("aim2<data:post.id/>");

var s=obj1.innerHTML;

var r=s.search(/\x3C!-- adsense --\x3E/igm);

if(r>0) {obj0.innerHTML=s.substr(0,r);obj1.innerHTML=s.substr(r+16);}

</script>

Replace the blue line with your Adsense code and save the template.

Now whenever you are writing any post just add the below code at the place where you want the Adsense ads to be shown in the post.

<!-- adsense -->

and continue writing the rest post.

Now whenever you will publish your post you will see Adsense ads in between posts at the place where you placed the above line.

source-bloggerzbible


How to Change a File Extension in Windows


This post shows you how to change the name of a file extension in Windows. For example, you might want to change a file called mypage.htm to mypage.php, or myvideo.vob to myvideo.mpg. These instructions are  the basic process applies to most versions of Windows 
NOTE: Changing a file extension should only be done if you are confident it's the right thing to do. When you change an extension, one of three things is likely to happen:
  1. It won't make any difference to how the computer deals with the file.
  2. It will enable some programs to recognize and work with a file, while other programs may no longer recognize it.
  3. It will not have any useful effect and the file will no longer open properly.

                               WINDOW 7

My Computer

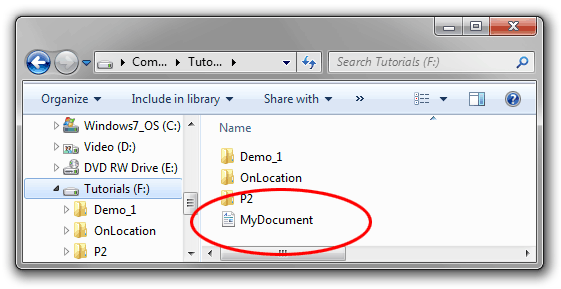
The first thing to do is open Windows Explorer (or My Computer) and view the file you wish to change. We'll use the example of a file called MyDocument.rtfwhich we want to change to MyFile.txt. When we browse to the file it looks like this:

You'll notice that the file does not appear to have an extension — it's just called MyDocument.rtf. This is because Windows is set to hide extension names. Go to organize > Folder and Search Options, then click the View tab. Uncheck the box titled "Hide extensions for known file types" like so:

Click OK or Apply. Now you should be able to see the file extension:


Right-click the file name and select Rename (or left click and hold down the button for one second). Enter the new extension like so:

After entering the new extension, hit the Enter (return) key. Windows will give you a warning that the file may not work properly. This is quite safe — if the file does stop working you can always change the extension back (just make sure you remember what it was!).
It's also possible that you might get another message telling you that the file is "read-only". In this case either say yes to turning off read-only, or right-click the file, select Properties and uncheck the Read-only box.
If you do not have permission to change the file extension, you may have to login as Administrator. Another option is to make a copy of the file, rename the copy and then delete the original.
Note: Windows treats file extensions as case-insensitive, i.e. .RTF is the same as .rtf. However other operating systems do not, and will treat MyDocument.RTFand MyDocument.rtf as two different files. Therefore it is good practice to always treat your files as case-sensitive for maximum compatibility. This is especially crucial if you are going to use the files on the Internet. We strongly recommend that you get into the habit of using all lower-case letters for all file extensions.

WINDOW XP

Windows Explorer

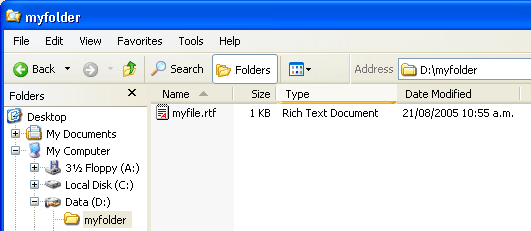
The first thing to do is open Windows Explorer (or My Computer) and view the file you wish to change. We will use the example of a file called myfile.rtf which we want to change to myfile.txt. It looks like this in Windows Explorer:

At this stage you might notice that your file does not appear to have an extension (in the above example it would simply be called myfile). This is probably because you have Windows set to hide extension names. Go to Tools > Folder Options, then click the View tab. Uncheck the box titled "Hide extensions for known file types" like so:

Click OK. Now you should be able to see the file extensions for all files. Right-click the file name and select Rename. Enter the new extension like so:


After entering the new extension, hit the Enter (return) key. Windows will give you a warning that the file may not work properly. This is quite safe — if the file does stop working you can always change the extension back (just make sure you remember what it was!).
If you get another message telling you that the file is "read-only" and asking if you want to turn read-only off, say yes.

The Benefits of Using Facebook Groups


As we know that facebook bring new look for there groups. You are probably connected with multiple sets of people on Facebook that have little in common. For instance, you are friends with your work colleagues, college mates, family members and so on. What you share on Facebook, like a picture or a video, may be interesting to one set of contacts but the other set may just see it as pure noise.

To deal with this problem, Facebook has long had a feature called list that let you limit the visibility of your status updates to select contacts but the feature never really took off. Now Facebook has come up with an even better solution in the form of Facebook Groups.

With Facebook Groups, you can form multiple smaller networks of people inside Facebook and what you share with one group stays in that group. That means if you share your kids pictures among the “family” group, they won’t show up in your colleagues’ news feed.

Other than private messaging, Groups give you access to some new communication tools in Facebook that were not available available before. Some examples:

1. Interact without logging into Facebook

facebook email address

When you create a group in Facebook, you have the option to assign a unique email address to that group. (Go to Edit Group –> Choose a Group Email Address)

This is so interesting because you now can interact with your Facebook friends using your email client itself without having to log into Facebook.com. If someone posts a picture or a message on the Facebook group, you get an email notification and you can add a comment to that post by simply replying to that email message.

2. Group Chat Many:Many

The regular chat in Facebook is 1:1 but with Groups, all the members of that group can talk to each other simultaneously. For the first time, you can get to chat with people on Facebook who are not your friends but are part of the same group.

3. Wiki meets Facebook

wiki facebook

Facebook Groups have a wiki-like feature called “Docs” that group members can use to create text documents with Facebook itself.

These document can be edited by any other group member and Facebook stores a log of every single edit that’s made to the document just like a regular wiki.

4. Send Bulk Email

Let’s say you have a party at home and you want to send an invite to all your Facebook friends. The problem is that Facebook won’t let you send a message to more than 20 friends at a time.

As a workaround, you can create a temporary “secret” group with all your Facebook friends and anything that you now post in this group will be sent to their inboxes as well. As far as I know, there are no limits on the maximum number of people who can be part of your Facebook group.


THANKS TO LABNOL for such a nice post

Adsense Below the post title and below post in Blogger


Your blog earnings depend mainly on your blog's traffic and on your ad placement. One important place to place the ads is below the Post title. It will give more importance to the ads and there is more possibility to get clicks. This is in accordance with the Google Adsense TOS

Ok now let us get into the details of how to set it up.

First of all login to your adsense account and generate ad code of optimum size..
now use adsense parser and parse adsense code
to parse adsense code visit here

Copy off the parsed code..
Now login to your blogger account.
Go to Layout > Edit Html and expand the widget templates.
Find this piece of code

<data:post.body/>

Now add the following code just above that line.


<!-- TECHNOWIT Adsense Above Posts start -->
<b:if cond='data:post.isFirstPost'>
Put your parsed adsense code here
<br/>
</b:if>
<!-- TECHNOWIT Adsense Above Posts End -->

if guys u r using read more hack

then paste this code after 2 times
<data:post.body/>

IF you want to show adsense code below blogger post

then paste your adsense code after
<data:post.body/>

hope u will earn more after this....

waiting for your reply.....


Show Ads Between Blogger Posts

If you want to show ads between your posts but chose not to do it while initially signing up for AdSense, first go to your Template | Page Elements tab. Then, in the "Blog Posts" section, click on "Edit". A pop-up window will appear with options to configure your blog posts. Check the box next to "Show Ads Between Posts". (Note: You must be signed up for AdSense before you can check this box.)

Show Ads Between Posts

Once you check this box you'll see the configuration options for your ads. You can then select how often you would like ads to be shown after your posts.

Show after every x posts

For example, if you want ads to be displayed after every post, select "1" from the drop-down menu. (Please note that AdSense policies limits you to a total of 3 ad units per page and Blogger will automatically prevent you from going over this limit.) You can then select your ad format and colors. Once you have finished configuring your ads, click on the orange "Save Changes" button in the bottom right corner.

Facebook Groups Redesign

Facebook rolled out a revised Groups feature. Groups allows you to communicate with people and friends you designate in a group – such as work, home, church, classmates, etc.

Facebook set the default to closed, i.e. only people in your group can see and post in the group.

Here’s a blog post by Facebook’s founder, Mark Zuckerberg, explaining why they made the changes and the benefits of the new version. Here’s an alternate view of the new Facebook Groups from the New York Times. Here’s a take on it by John Haydon that explains how these changes might impact a nonprofit on Facebook.Facebook announced platform changes to Groups at their offices in Palo Alto on October 6. If you’re currently using Facebook Groups or Pages to communicate with targeted communities, here’s a helpful guide to how the new Groups option will affect you.


Why did Facebook update Groups?

From Facebook: “The new Groups product enables members to selectively share information with a small group. Old Groups were built around the same goal of helping people share with a group, but users told us it was harder to use that as a means of sharing personal information with a small group of their friends. The new design offers you a shared space where you can share personal information with a smaller subset of people with whom you interact on a more regular basis, like family, classmates or co-workers.”

New Features

  • Group Chat: You can chat with multiple other members of a group in real-time on Facebook Chat.
  • Docs: The new design has a shared notepad, which allows you to collectively write and edit notes with a group.
  • Mailing list-style notifications: Keep up-to-date with other group members through a variety of notification options.

I got a chance to play around with several of the new features and here are my initial reactions to the redesign. My specific focus is on Admissions and incoming student communities, but these can be translated to other communities as well.

Pros

  • Notifications are a huge deal. Groups now have advanced options on how they receive notifications. This option will drive more return visits to the group as they receive notifications on post comments and ‘likes’.
  • Group chat is an option students have been waiting for. It’s dead simple to use and will be another reason group members keep engaged and return to the Group page. All members of a group can use group chat, regardless of whether they are ‘friends’. Only ‘friends’ can contact each other through individual chat messages.
  • Docs allow administrators an easy way to post deadlines, FAQ’s, and general updates to the group. Docs can be viewed and edited by any member of the group, allowing for a wiki-like experience.
  • Events can now easily be created and promoted within a Group. I spent hours last year creating events in the Old Groups (since I was the admin) but now this task is handled by any group member.
  • Feature Boxes on the right column of a Groups page give easy access to Group events and docs.

Cons

  • No more discussion threads. Some Old Groups used them heavily, but they are absent in the new style. New Groups are more focused on a constant stream of information and updates.
  • Pictures are only available through the activity stream, but surprisingly not through an archive or feature box. Unless you go back through the activity stream, there’s no easy way to find pictures posted to the Group.
  • Friends can add YOU to any group, without your permission. You can remove yourself after the fact, but you can’t (as of now) restrict friends from adding you to any number of random Groups.

Administration of Groups

Admins still have most of the same options for setting up and maintaining Groups, but it may be a little confusing with the redesign. To edit group options, select the Edit Group option in the top-right. You can edit:

  • Privacy settings
  • Group name (yes, you can change a group name after it’s created)
  • Group email address for notifications
  • Group description

To edit group members and set other administrators, look to the left-side column while on the Edit Group page. Using the Members option, you can add more friends to the group, remove group members and set new admins.

Summary

I see a lot of potential with this redesign of Groups, especially with the inclusion of advanced notifications and group chat. I’m excited to set up a new Group for our incoming class and compare the activity with previous Groups and Pages.

Detailed information about new Groups is available from Facebook.

Are you excited about the Groups redesign? Do you plan on creating new Groups for your school communities?